 |
| 2D Collision with Game JavaScript HTML5 Applet Simulation Model http://iwant2study.org/ospsg/index.php/568 |
Monday, October 23, 2017
2D Collision with Game JavaScript HTML5 Applet Simulation Model
2D Collision with Game JavaScript HTML5 Applet Simulation Model
DC Circuit by Tan KS
 |
| DC Circuit by Francisco Esquembre and Tan KS http://iwant2study.org/ospsg/index.php/567 |
Mass Spectrometer JavaScript HTML5 Applet Simulation Model by Leong TK
 |
| Mass Spectrometer JavaScript HTML5 Applet Simulation Model by Leong TK http://iwant2study.org/ospsg/index.php/08-electromagnetism/566 |
Two Pendulum Real and Theory JavaScript HTML5 Applet Simulation Model by Lam MH
Two Pendulum Real and Theory JavaScript HTML5 Applet Simulation Model by Lam MH
 |
| Two Pendulum Real and Theory JavaScript HTML5 Applet Simulation Model by Lam MH http://iwant2study.org/ospsg/index.php/565 |
Sunday, October 22, 2017

Max measures by 2017 workshop participant
 |
| Max measures by 2017 workshop participant http://iwant2study.org/ospsg/index.php/563 |
Modified Simple Ray Diagram by 2017 workshop participant
 |
| Modified Simple Ray Diagram by Wolfgang Christian ,Francisco Esquembre, Mario Belloni and 2017 workshop participant http://iwant2study.org/ospsg/562 |
First Order DE (Concentration Changes in Tank) by Lam MH
 |
| First Order DE (Concentration Changes in Tank) by Lam MH http://iwant2study.org/ospsg/index.php/561 |
Storm Water Pit Simulation by Vincent Lew
 |
| Storm Water Pit Simulation by Vincent Lew http://iwant2study.org/ospsg/index.php/560 |
Mass and Spring Projectile by Darren Tan
 |
| Mass and Spring Projectile by Wolfgang Christian, Francisco Esquembre and Darren Tan http://iwant2study.org/ospsg/index.php/559 |
Work Done on a Block (Work-Energy Principle) by Nur Shahzreen
 |
| Work Done on a Block (Work-Energy Principle) by Nur Shahzreen http://iwant2study.org/ospsg/index.php/558 |
Friday, October 20, 2017
Day4 2017 16,17,19,20 October Workshop edulab@AST
This is live working document for the workshop.
Day2 2017 16,17,19,20 October Workshop edulab@AST
Day2 2017 16,17,19,20 October Workshop edulab@AST
Day 4 Content of Workshop:
1. Independent work and consultations on curriculum simulation design.
Survey on Participants' needs
Why do you want to attend this series of workshop?
- I want to learn how to create simulations that students can visualise<Boon Leong has one>. I'm teaching Further Math in JC, so I thought it will be useful to be able to create models using some scripting.
- Simulations of the motions of springs <Paco's example> / rope <Paco has one>.
- Learn to construct Apps <Felix will cover this is Day2>
- An app which can allow them verify the current and voltage of a d.c circuit <Seng Kwang's example>.
- To learn how to create Apps that can help students better understand concepts at their finger tips.
- To get ideas for student projects for physics.
- To explore use of mobile apps/handphone to enhance teaching of physics.
What do you want to create at the end of the 4 days? We will teach you the skills and knowledge but you need to practise making apps yourself. :)
- To learn how to create relevant apps for Physics/Maths teaching.
- Maybe an app to teach centre of gravity<Lawrence's example> or electricity<Lawrence's examples>.
- I would like to learn how to create mobile app simulations that can aid the teaching and learning of physics
- An educational mobile app where students can simulate collisions of objects and analyse the object's forces and motion<Lawrence's example>, it would be a bonus if there could be a quiz/game <Tze Kwang's idea> element to the app.
- Apps on characteristics of image formed by a converging lens <Lawrence's example>, D.C. Circuits Play, Fleming's Rule <Lawrence's example>.
- Simulations involving multi-variables, possibly even recursive relations.
- An apps to teach gravitation <Lawrence's example> or work, energy power<Lawrence's example> etc.
2. Reflecting/presenting teacher performance task sharing especially sharing the debug.APK.
3. Expert sharing like ... participants to choose learning analytics, Moodle integration plugins, tapping on mobile sensors, etc ...
3.1 Sensors in EjsS
The ejss_src_SHOHorizontalWithAccelerometer.zip simulation shows how to use accelerometer of your mobile.
This functionality is based on the Accelerometer model element.

To add the Accelerometer element to your model, drag the icon element to
the list of your model elements.
The element implements the following basic methods:
The element implements the following basic methods:
- boolean isPresent(): whether the hardware includes an accelerometer
- void start(): turns the accelerometer on
- void stop(): turns the accelerometer off
- boolean isRunning(): whether reading accelerometer data has been started (using start())
- Object getDeviceData(): reads the raw data (in the device reference frame) of the acceleration measured (including gravity) and the rotation of the device. The object has x,y,z components for the acceleration, and alpha,beta,gamma for the rotation. The values are all zero if the accelerometer is not present or has not been started.
- Object getViewData(): returns a similar same object as getDeviceData(), but the acceleration is in the user's view reference frame (which has the X and Y axes horizontal and vertical on the screen and Z perpendicular to it). This function take scare of orientation changes of the screen and also differences among operating systems.
Example of use:
accelerometer.start(); // Starts the accelerometer
var data = accelerometer.getDeviceData(); // Reads the current acceleration
_println("The acceleration on the X axis is " + data.x);
_println("The acceleration on the Y axis is " + data.y);
_println("The acceleration on the Z axis is " + data.z);
var viewData = accelerometer.getViewData(); // Reads the acceleration in the view reference system
_println("The view acceleration on the X axis is " + viewData.x);
_println("The view acceleration on the Y axis is " + viewData.y);
_println("The view acceleration on the Z axis is " + viewData.z);
accelerometer.stop(); // Stops the accelerometer
3.2 Camera in EjsS
The ejss_src_dataLogger.zip simulation shows how to capture video data and image data.
This type of apps requires user to enable video permissions in the specific mobile.
Settings -> Apps -> [My App] -> Permissions -> Camera (allow)
The simulation is running in this link.
3.3 Moodle EjsS plugin and remote labs
EjsS is used to develop remote labs and also can be easily integrated into Moodle.
In this link, find extensions for Easy Javascript Simulations: plugins for Moodle, elements for connecting with LabView, Matlab, Simulink and Node.js, new features...
3.4 Learning Analytics & EjsS
EjsS includes functions to register all user interactions in order to develop learning analytics.
Open the ejss_src_Pendulum.zip simulation to test how to register interactions.
EjsS includes functions to register all user interactions in order to develop learning analytics.
Open the ejss_src_Pendulum.zip simulation to test how to register interactions.
The Initialization function includes the Capture page with: _model.startRegister() starts the registration of all user events into the simulation.
The onPress event includes the following code:
interactions = JSON.stringify(_model.stopRegister());
this function stop the registration process and returns a JSON object with all user interactions.

Photo

 |
| participants of workshop |

Monday, October 16, 2017
Day2 2017 16,17,19,20 October Workshop edulab@AST
This is live working document for the workshop.
Day2 2017 16,17,19,20 October Workshop edulab@AST
Day2 2017 16,17,19,20 October Workshop edulab@AST
Day 2 Content of Workshop:
- Day2
- Modelling and visualization with EJS Dropbox Workshop folder FE (90 mins)
- Break Networking (30 mins)
- Installation of software for App creation: Export one existing model with supporting description into android APK file for deployment. FG (60 mins)
- Lunch 12 to 2
- Definition of personal project (All) concurrently with 3, How to create and App from an existing simulation, Decide on one/two simulation to work in pairs or alone, continue to improve your chosen customised simulation. FE (60 mins)
- Break Networking (30 mins)
- Advanced features of EjsS like how to debug using Chrome Developer, debug EjsS apps, and adapt templates. FE/FG (90 mins)
1. Export one existing model with supporting description into android APK file for deployment.
Contents:
1.0 Test your software installation
1.1 Test Ionic creating your first app
1.2 Create the basic structure of your EjsS app
1.3 Create your first EjsS app
1.4 Build and test your EjsS app1.5 Test templates and options in prepacking your EjsS app
1.6 Share your EjsS app
1.0 Test your software installation
Make sure you have Node (and NPM package) and Ionic installed by running simple commands to see what version of each is installed:
- Test Node. To see if Node is installed, open the Windows Command Prompt , by typing cmd on the windows find
 , Powershell or a similar command line tool, and type node -v. This should print a version number, so you’ll see something like this v6.11.2 (or upper).


- Test NPM. To see if NPM is installed, type npm -v in Terminal. This should print NPM’s version number so you’ll see something like this 3.10.10 (or upper).


- Test Ionic. To see if Ionic is installed, type ionic -v in Terminal. This should print Ionic’s version number so you’ll see something like this 3.13.0 (or upper).


Note: new versions come out frequently. To install the updates, just download the installer and run it again.

Also make sure you have SDK Android installed and your Android device ready by running simple commands to see what version of each is installed:
- Test Android SDK. To see if Android SDK is installed, launch Android Studio, and open Android SDK.


This should show a SDK Android windows with packages installed.


This should show a SDK Android windows with packages installed.

- Debugging mode enabled in your device. Follow these steps using your mobile:
Launch the Settings
 app and then swipe all the way down and tap on ‘About phone.’
 Next scroll down in this menu as well and you should see an option called ‘Build number.’

Constantly tap on this option till you see a prompt on the display stating ‘You are now a developer.’
Now go back to the main Settings page and scroll all the way down once more.
You will see the new ‘Developer Options’
 entry right on top of ‘About phone.’
Simply tap on it and start exploring what options you can manage.


Plug your Android smartphone or tablet into your computer with its USB cable.
Launch the Settings
 app and then swipe all the way down and tap on ‘About phone.’

Constantly tap on this option till you see a prompt on the display stating ‘You are now a developer.’
Now go back to the main Settings page and scroll all the way down once more.
You will see the new ‘Developer Options’

Simply tap on it and start exploring what options you can manage.


Plug your Android smartphone or tablet into your computer with its USB cable.
Ionic provides you with a set of commands to make easy to create hybric apps. In order to test your Ionic installation, the following step shows how to create a simple app.
- Type npm install -g cordova ionic in Terminal. This should install Ionic or check your Ionic installation. Also type ionic info in Terminal to display version information.

Note: Ionic tools require some environment variables to be set in order to function correctly. It will attempt to set these variables for you, but in certain cases you may need to set them manually. See this link.
- Type ionic start myApp tabs in Terminal. This should create an Ionic app using one of our ready-made app templates, in particular, tabs template. Other templates are blank and sidemenu.

- Run your app in your browser. Type cd myApp and then ionic serve in Terminal. This should allow you to build your app in the browser.

You can cancel the running using Ctrl+C.
- Run your app in your Android device. Firstly, check if USB debugging is enabled on your Android device, then type ionic cordova run android --device in Terminal. This should produce a debug build of your app, both in terms of Android and Ionic’s code.
Note: ignore warnings and error messages. If the app is not running in your mobile, please try to type the command again. If the problem remains, maybe your Android SDK platform is not installed (check it using Android Studio) or your Android SDK is located in unusual directory (then you need to set ANDROID_HOME) or you need http://www.oracle.com/technetwork/java/javase/downloads/jdk8-downloads-2133151.html, however please let us know.
Note: other relevant problem with Ionic is its dependeces with other packages, e.g. cordova or angular. Sometimes when we use the latest versions, we can find compatibility issues. In this case, if you need to install a previous version of cordova.

The display shows where you can find the files APK that you can distribute (e.g. via email) to install your app in any Android device.
Your mobile should ask you for letting your computer launch apps. Check "Always allow from this computer" and click OK.

Finally, your device should launch your app.

1.2 Create the basic structure of your EjsS app
- Create a new blank Ionic project. Type ionic start MyModelApp blank in Terminal. The blank template is a bare starter with a single page.

This should create a new project with the following directory structure. Type cd MyModelApp and check this directory structure.

For now, we only need to know about the src and www directories. Inside of the src directory we find our uncompiled TypeScript code. When we run ionic serve, our code inside of src/ is transpiled into HTML/Javascript code. That means we can work at a higher level using TypeScript, but compile down to the standard form of HTML/Javascript that the browser needs.
- Add target platforms. It depends on your platform, focusing on Android, type ionic cordova platform add android in Terminal. For iOS, type ionic cordova platform add ios. Using ionic info you can display information about Android platform.

- Add particular plug-ins. Our EjsS app require the following plugins.

Note: another alternative to type cordova plugin is ionic cordova plugin.
- Run your blank app in your browser. Type ionic serve in Terminal. This should allow you to build your app in the browser.

- Save the basic structure to be reused in future apps. Copy&Paste the directory MyModelApp and then you could reuse the basic structure of your EjsS apps in future projects.
1.3 Create your first EjsS app
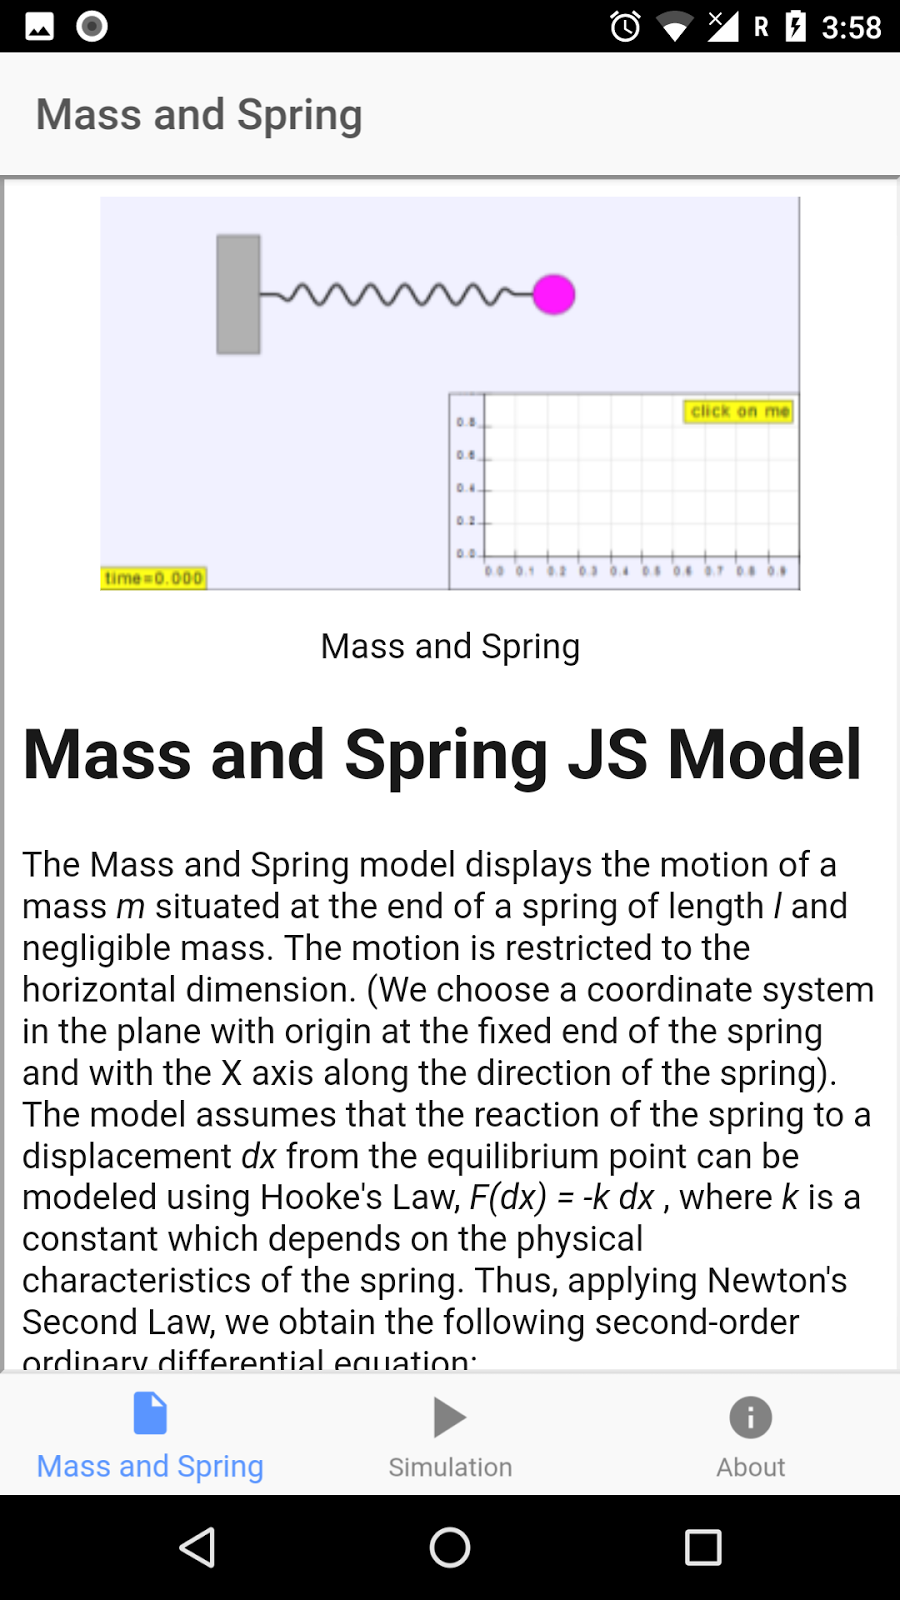
- Open your EjsS simulation. Choose a EjsS simulation in order to create its Ionic app. We propose to use MassAndSpring simulation (ejss_src_MassAndSpring.zip on the workshop directory).
- Create the prepackaged files with EjsS. Click using the right mouse button and select "Prepackage for App".

Choose how you want to build your Ionic app. For default, use Ionic v2 because Ionic v1 is to support old Ionic versions. Choose your app template (side menu, tabs, slides or card). Lock screen if you need. And finally you can display full screen (i.e. menu options automatically disappear) or/and show firstly your simulation (no description pages).

Save your app prepackage in your workspace export directory. The typical name will be ejss_app_XXX.zip.

In addition, EjsS will show a window to open a web page with the process to create an app. If you are following this blog, you do not need to open this web page.

- Check the content of your prepackage files. Unzip the file and review the content. You should find the src and www directories with the files generated by EjsS.

- Copy files from your prepackage to the Ionic project. Now, we will extract the prepackaged files created with EjsS and work to modify the www and src folders of your project. Unzip the file you created with EjsS and overwrite all files.
1.4 Build and test your EjsS app

- Test your app in your Android device. Type ionic cordova run android in Terminal (you need your device connected).

1.5 Test templates and options in prepacking your EjsS app
- Create an app for each template (i.e. Side Menu, Tabs, Slides Intro, and Card). Follow the previous steps 1.3 and 1.4. You can use the same project (and the same directory).


- Test options in prepacking. The Screen Locking option is interesting when our simulation has a good usability only with a specific orientation. Also we can use the option Show Simulation First to first show the simulation when the app is open. Test both properties creating a new app.

Finally, the Display Full Screen option hides the menu bar to show the simulation using full screen.
1.6 Share your EjsS app. You can easily share your app, email the apk file and open it into your mobile phone.

Note: sign and publish your app is out of scope, but you can get more information in this link.
Note: ignore warnings and error messages. If the app is not running in your mobile, please try to type the command again. If the problem remains, maybe your Android SDK platform is not installed (check it using Android Studio) or your Android SDK is located in unusual directory (then you need to set ANDROID_HOME) or you need http://www.oracle.com/technetwork/java/javase/downloads/jdk8-downloads-2133151.html, however please let us know.
Note: other relevant problem with Ionic is its dependeces with other packages, e.g. cordova or angular. Sometimes when we use the latest versions, we can find compatibility issues. In this case, if you need to install a previous version of cordova.

The display shows where you can find the files APK that you can distribute (e.g. via email) to install your app in any Android device.
Your mobile should ask you for letting your computer launch apps. Check "Always allow from this computer"

Finally, your device should launch your app.

1.2 Create the basic structure of your EjsS app
- Create a new blank Ionic project. Type ionic start MyModelApp blank in Terminal. The blank template is a bare starter with a single page.

This should create a new project with the following directory structure. Type cd MyModelApp and check this directory structure.

For now, we only need to know about the src and www directories. Inside of the src directory we find our uncompiled TypeScript code. When we run ionic serve, our code inside of src/ is transpiled into HTML/Javascript code. That means we can work at a higher level using TypeScript, but compile down to the standard form of HTML/Javascript that the browser needs.
- Add target platforms. It depends on your platform, focusing on Android, type ionic cordova platform add android in Terminal. For iOS, type ionic cordova platform add ios. Using ionic info you can display information about Android platform.

- Add particular plug-ins. Our EjsS app require the following plugins.
> cordova plugin add ionic-plugin-keyboard
> npm install --save @ionic-native/keyboard
> cordova plugin add cordova-plugin-screen-orientation
> npm install --save @ionic-native/screen-orientation

Note: another alternative to type cordova plugin is ionic cordova plugin.
- Run your blank app in your browser. Type ionic serve in Terminal. This should allow you to build your app in the browser.

- Save the basic structure to be reused in future apps. Copy&Paste the directory MyModelApp and then you could reuse the basic structure of your EjsS apps in future projects.
1.3 Create your first EjsS app
- Create the prepackaged files with EjsS. Click
 using the right mouse button and select "Prepackage for App".
Choose how you want to build your Ionic app. For default, use Ionic v2 because Ionic v1 is to support old Ionic versions. Choose your app template (side menu, tabs, slides or card). Lock screen if you need. And finally you can display full screen (i.e. menu options automatically disappear) or/and show firstly your simulation (no description pages).

Save your app prepackage in your workspace export directory. The typical name will be ejss_app_XXX.zip.

In addition, EjsS will show a window to open a web page with the process to create an app. If you are following this blog, you do not need to open this web page.

- Check the content of your prepackage files. Unzip the file and review the content. You should find the src and www directories with the files generated by EjsS.

- Copy files from your prepackage to the Ionic project. Now, we will extract the prepackaged files created with EjsS and work to modify the www and src folders of your project. Unzip the file you created with EjsS and overwrite all files.
1.4 Build and test your EjsS app
- Test your app in browser. Type ionic serve in Terminal. This should allow you to build your app in the browser.

- Test your app in your Android device. Type ionic cordova run android in Terminal (you need your device connected).

1.5 Test templates and options in prepacking your EjsS app
- Create an app for each template (i.e. Side Menu, Tabs, Slides Intro, and Card). Follow the previous steps 1.3 and 1.4. You can use the same project (and the same directory).


- Test options in prepacking. The Screen Locking option is interesting when our simulation has a good usability only with a specific orientation. Also we can use the option Show Simulation First to first show the simulation when the app is open. Test both properties creating a new app.

Finally, the Display Full Screen option hides the menu bar to show the simulation using full screen.
1.6 Share your EjsS app. You can easily share your app, email the apk file and open it into your mobile phone.

Note: sign and publish your app is out of scope, but you can get more information in this link.
2. Decide on one/two simulation to work in pairs or alone, continue to improve your chosen customised simulation.
- Try to create a preliminary app with your simulation.
- Decide what prepacking options are the best for your simulation.
- Decide what prepacking options are the best for your simulation.
3. Advanced features of EjsS like how to debug using Chrome Developer Tools, debug our EjsS apps, and adapt Ionic templates.
3.1 How to debug using Chrome Developer Tools
- My first debugging using window.alert("hello")
Debugging JavaScript code in EjsS can sometimes be a little time consuming. If you are just beginning JavaScript/EjsS you may start using alert() or window.alert(). Try to use this function to show the value of your variables or only checking running points.
For example, add this code in your Mass And Spring app:

And this code in the onclick event of the labelTitle element:

Check and verify both alert functions using your browser.
- Continue to debug using console.log("hello")
You may find alert() a little unsuitable because it breaks the running. In this case, you can use console.log() to display your text in Console.
First, you can find Console into Developer tools (or F12 key).

Developer Tools window includes several tabs, select Console.

Now, change your alert() functions for console.log() functions, and then test the Console output.

Console will also show any error or warning message generated by our simulation.
- Use Chrome DevTools
While these two previous approaches may work, they usually involve a lot of writing and deleting code, going back and forth between your browser and the EjsS Authoring Tool.
Google Chrome browser comes with developer tools that can help us in debugging JavaScript/EjsS code, among other things:
The main method to debug JavaScript is using breakpoints (places where code execution can be stopped), and examine variables while the code is executing.

Unfortunately, the position of breakpoints is not well interpreted by Chrome and sometimes it is difficult to find the right breakpoint location.
Finally, other way to debug is using the debugger keyword that stops the execution of JavaScript, and calls the debugging function. This has the same function as setting a breakpoint in the debugger.
For more information, see this link.
3.2 How to debug our EjsS app


3.3 How to adapt Ionic templates and final EjsS apps
- Change name, author, description and identifier. The config.xml file includes default information that you can edit freely. Change these values for your app.
- Change your app icon. Two alternatives, use ionic cordova resources (you need to have an ionic account), or directly place the source image in the respective platform’s directory. For example, to use a different icon for Android, the image should follow this path: resources/android/icon/*.


The starting point to adapt your app is when you can see it in your browser using ionic serve. This lets you see in real-time how your EjsS app changes.
Check the content of the src directory. It depends on the original Ionic template used (sidemenu, tabs, cards or slides).


- /www/model_pages: simulation pages and description pages.
- /www/js/pages.js: internal javascript variables.
For more information, see this link.
3.1 How to debug using Chrome Developer Tools
- My first debugging using window.alert("hello")
Debugging JavaScript code in EjsS can sometimes be a little time consuming. If you are just beginning JavaScript/EjsS you may start using alert() or window.alert(). Try to use this function to show the value of your variables or only checking running points.
For example, add this code in your Mass And Spring app:

And this code in the onclick event of the labelTitle element:

Check and verify both alert functions using your browser.
- Continue to debug using console.log("hello")
You may find alert() a little unsuitable because it breaks the running. In this case, you can use console.log() to display your text in Console.
First, you can find Console into Developer tools (or F12 key).

Developer Tools window includes several tabs, select Console.

Now, change your alert() functions for console.log() functions, and then test the Console output.

Console will also show any error or warning message generated by our simulation.
- Use Chrome DevTools
While these two previous approaches may work, they usually involve a lot of writing and deleting code, going back and forth between your browser and the EjsS Authoring Tool.
Google Chrome browser comes with developer tools that can help us in debugging JavaScript/EjsS code, among other things:
- Editing CSS - Using the Element tab you can select an element in the browser, e.g a panel, right click on it and select inspect element. This gives you an option to edit the css on the far right.
- Testing performance - Using the Performance tab, in which you can see how long it takes to run any function of your application.
- Debugging JavaScript - Using the Sources tab you can debug JavaScript code. This is what we will talk about following.
The main method to debug JavaScript is using breakpoints (places where code execution can be stopped), and examine variables while the code is executing.

Unfortunately, the position of breakpoints is not well interpreted by Chrome and sometimes it is difficult to find the right breakpoint location.
Finally, other way to debug is using the debugger keyword that stops the execution of JavaScript, and calls the debugging function. This has the same function as setting a breakpoint in the debugger.
For more information, see this link.
3.2 How to debug our EjsS app
The best way to debug our EjsS app is to use our Chrome browser. Run our simulation typing ionic serve and then check the Console tab.

In addition, set a breakpoint and examine variables.

Debugging using breakpoints in apps is less problematic than directly running our simulation from EjsS Authoring Tool.
- Change name, author, description and identifier. The config.xml file includes default information that you can edit freely. Change these values for your app.
- Change your app icon. Two alternatives, use ionic cordova resources (you need to have an ionic account), or directly place the source image in the respective platform’s directory. For example, to use a different icon for Android, the image should follow this path: resources/android/icon/*.
To create your icon, this link provides you with an online tool to upload an image and then download a zip file with icons. Follow these steps:
- Open Launcher icon generator, upload an image and set your options.

- Download the zip file, upzip it, and copy/rename all png files into resources/android/icon/

- Run your app typing ionic cordova run android
In the same way, you can change your splash images in the resources/android/splash/*.
- Change the Ionic template. Any Ionic template can be adapted and improved, you only have to modify the src files that are generated by EjsS Authoring Tool.
The starting point to adapt your app is when you can see it in your browser using ionic serve. This lets you see in real-time how your EjsS app changes.
Check the content of the src directory. It depends on the original Ionic template used (sidemenu, tabs, cards or slides).

- /src/pages/about: about page. For example, edit about.html and change the title "About this app" for "Info about this app". Now, review your browser and check the change.
- /src/pages/home: main page
- /src/pages/<template>: template pages

- /www/model_pages: simulation pages and description pages.
- /www/js/pages.js: internal javascript variables.
For more information, see this link.
Subscribe to:
Posts (Atom)
2D Collision with Game JavaScript HTML5 Applet Simulation Model
2D Collision with Game JavaScript HTML5 Applet Simulation Model 2D Collision with Game JavaScript HTML5 Applet Simulation Model http://i...

-
 Storm Water Pit Simulation by Vincent Lew http://iwant2study.org/ospsg/index.php/560
 -
 Mass Spectrometer JavaScript HTML5 Applet Simulation Model by Leong TK http://iwant2study.org/ospsg/index.php/08-electromagnetism/566
 -
 This is live working document for the workshop. Day2 2017 16,17,19,20 October Workshop edulab@AST Day 2 Content of Workshop: Day2 ...